Understanding the Appeal of Glass Railings for Coastal Decks
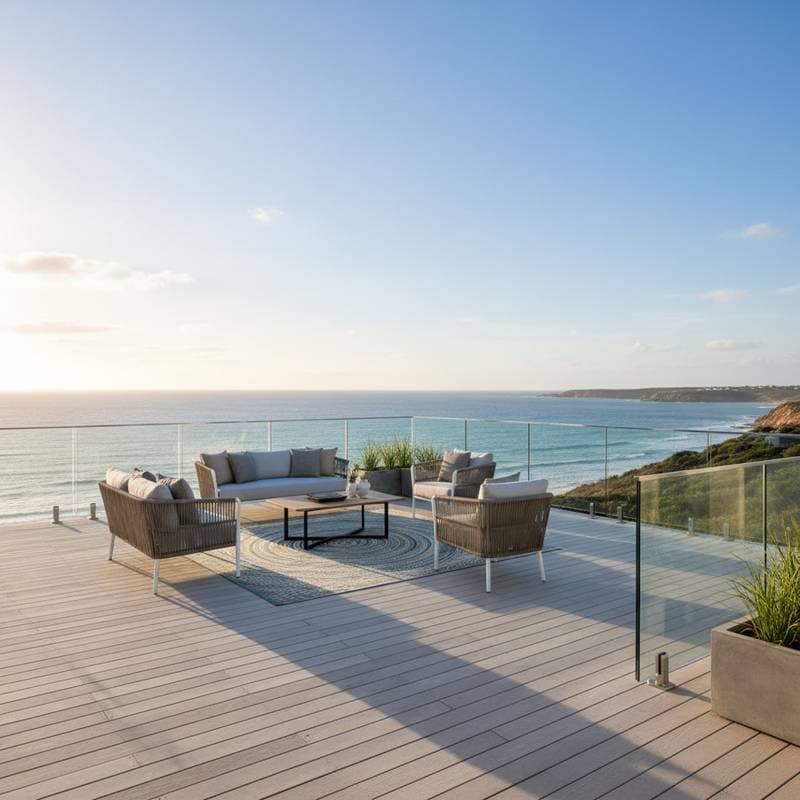
Glass railings emerge as a premier choice for coastal decks in 2025, offering an elegant fusion of safety and visual openness. These systems allow homeowners to enjoy uninterrupted views of the ocean while meeting stringent building codes. Their sleek profile complements the natural beauty of seaside environments, making them a staple in modern outdoor designs.
Homeowners appreciate how glass railings flood decks with natural light and create a sense of expansiveness. Unlike traditional wood or metal barriers, glass maintains transparency without obstructing sightlines. This feature proves especially valuable in coastal settings where scenic appreciation drives design decisions.
As trends shift toward minimalist and sustainable living, glass railings align perfectly by using durable, low-maintenance materials. They withstand harsh marine conditions better than many alternatives, ensuring long-term performance.
Breaking Down the Costs
Investing in glass railings involves several expense categories, each influenced by location and design complexity. Material costs for tempered glass panels range from $50 to $120 per linear foot, depending on thickness and finish. Frameless options command higher prices due to specialized hardware.
Labor and installation contribute significantly, with professionals charging $40 to $80 per linear foot. In coastal areas, these rates may rise to account for enhanced wind load specifications and corrosion-resistant materials. Expect additional fees for site preparation in salty, humid climates.
Permits and engineering add another layer, as many coastal jurisdictions mandate structural reviews and certifications for safety glass. These can total $300 to $800, varying by local regulations. If replacing an existing railing, demolition and disposal might incur $500 to $1,000 extra.
For new constructions, factor in reinforced structural supports to bear the glass weight, approximately 8 to 10 pounds per square foot. Maintenance tools, such as specialized cleaners and squeegees, represent a minor ongoing cost but ensure longevity.
Exploring Glass Railing Systems
Several glass railing configurations suit coastal decks, each balancing aesthetics, functionality, and budget.
Post-Mounted Glass Railings
This system secures glass infill panels between metal or wood posts, providing a structured yet open appearance.
Ideal for: Property owners seeking a contemporary style with subtle textural elements.
Advantages: Simpler installation process, reduced expenses, and versatility across deck surfaces like wood or composite.
Drawbacks: Posts may slightly impede full visibility compared to seamless designs.
Frameless Glass Railings
These installations mount panels directly to the deck edge using top and bottom channels or standoffs, eliminating visible supports for a floating effect.
Ideal for: Sleek, modern decks where maximum transparency is paramount.
Advantages: Unparalleled views and a minimalist profile that enhances light flow.
Drawbacks: Higher costs and demands precise engineering to ensure stability in windy coastal zones.
Channel-Mounted Systems
Panels fit into horizontal channels along the deck's perimeter, offering a clean line without upright posts.
Ideal for: Straight-edged decks prioritizing ease of cleaning and durability.
Advantages: Strong resistance to impacts and simpler retrofitting on existing structures.
Drawbacks: Channels can collect debris if not designed with drainage in mind.
Select a system based on your deck's layout, budget, and exposure to elements. Consult local codes for height and spacing requirements.
DIY Installation Versus Professional Services
Glass railing projects range from moderate to advanced in difficulty, depending on the system chosen. Post-mounted varieties lend themselves to DIY efforts with prefabricated kits, while frameless setups often require expert precision.
Tackling DIY Installation
Homeowners with construction experience can manage post-mounted systems over 2 to 4 days for a standard deck.
Essential tools: Level, power drill, silicone sealant, safety gloves, suction cups for handling panels, and torque wrench.
Skill level: Moderate, assuming familiarity with basic carpentry.
Potential savings: $2,000 to $5,000 compared to full professional fees.
Proceed cautiously, as errors like improper alignment can compromise safety. Handle glass edges with care to prevent chips, and adhere strictly to manufacturer guidelines on spacing and securement. Protective equipment remains essential throughout.
Benefits of Professional Installation
Experienced contractors guarantee adherence to codes, robust structural support, and manufacturer warranties. They manage wind-load assessments and permitting, streamlining the process.
Projects typically span 3 to 5 days post-material delivery. In coastal builds, professionals incorporate moisture-resistant framing and stainless steel components to combat corrosion.
This approach minimizes risks and ensures seamless integration, particularly for complex frameless designs.
Strategies to Control Expenses
Glass railings represent a worthwhile investment, yet thoughtful choices keep costs in check.
- Hybrid approaches: Install glass on prime view sides and opt for cable or metal on less visible areas.
- Standard dimensions: Stick to off-the-shelf panel sizes to avoid premiums for custom fabrication.
- Local sourcing: Partner with regional suppliers for competitive rates on tempered glass and hardware.
- Post-mounted preference: Achieve an open aesthetic at a fraction of frameless pricing.
- Proactive upkeep: Routine cleaning with soap and water averts salt accumulation, extending hardware durability.
Consider phased implementation for tighter budgets. Modular designs allow incremental additions without disrupting existing setups.
Ensuring Longevity Through Maintenance
Coastal conditions challenge railings with salt, humidity, and sunlight, but glass systems prove resilient.
Conduct quarterly cleanings using mild detergent and a soft cloth or squeegee. Steer clear of abrasives that could scratch surfaces.
After storms, rinse promptly to eliminate salt deposits. Regularly check hardware for looseness or rust, tightening components as necessary.
Apply protective coatings every few years to boost water repellency and luster. Tempered or laminated glass withstands impacts without frequent replacements, while treated metals resist environmental wear. Proper care supports a lifespan exceeding 25 years.
Integrating Glass Railings into Coastal Styles
Glass railings adapt effortlessly to diverse coastal themes, from contemporary minimalism to relaxed beach vibes. Clear variants enhance airy, modern decks, whereas frosted or tinted options provide subtle privacy.
Combine with driftwood accents, durable composites, or crisp white trim for enduring appeal. Opt for non-reflective glass to minimize glare during peak sun hours.
In high-wind locations, laminated panels offer added strength and dampen noise. Tints in soft blue or gray temper intense light while preserving vistas. Verify local codes for standard heights of 36 to 42 inches and appropriate thicknesses before purchase.
Frequently Asked Questions
How secure are glass railings for households with young children?
They provide excellent protection when constructed with tempered or laminated safety glass, which breaks into harmless granules under pressure.
Do ocean proximity cause rapid soiling on glass railings?
Salt spray may form a thin layer, but biweekly wipes with gentle cleaners maintain clarity. Coatings simplify the task further.
Is retrofitting glass railings feasible on older decks?
Yes, provided the underlying structure supports the weight. Assessments confirm compatibility.
What thickness suits deck applications?
Post-mounted systems use 10 to 12 millimeters; frameless require up to 17 millimeters. Comply with regional standards.
Elevate Your Seaside Retreat
Glass railings transform coastal decks into inviting, view-centric havens that endure the elements. By selecting the right system and maintenance routine, homeowners unlock years of enjoyment. Start planning your upgrade to embrace 2025's leading trend in outdoor living.